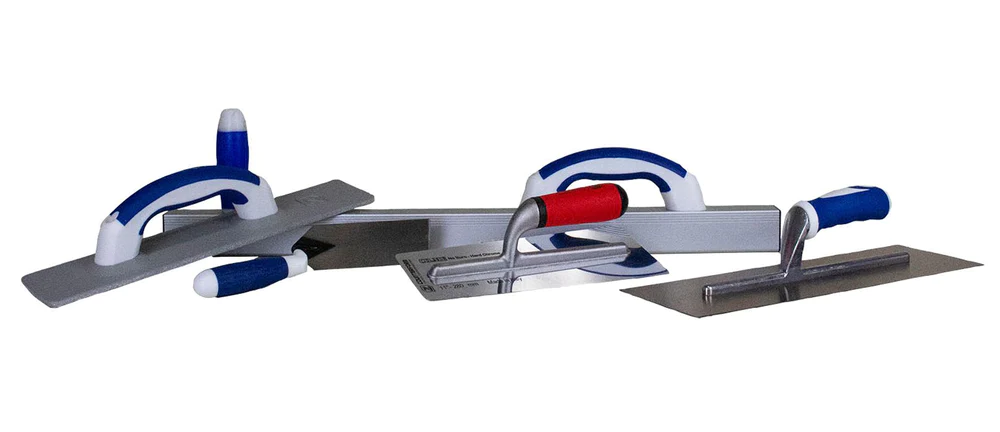
Tool Guide for Cast-In-Place Concrete Countertops
There are many different tools used when pouring a concrete countertop. For best results, you should have a clear understanding about what each tool is and how it is used.
Paddle Mixer/5 Gallon bucket – It’s important that whether you are using our White Countertop Mix or our LiquiCrete additive with a sand mix, that you mix it with a paddle mixer in a 5 gallon bucket. If you try and mix in a drum mixer, the fibers won’t disperse evenly, they will clump up and can be visible in the final finish. If you aren’t using one of our Hand Held Power Mixers, you should use a ½” corded drill with a spiral shaped paddle.
Screed – You want to find a screed that is longer than your widest section of countertop. In other words, if you have an island that is 46” x 76”, you want the screed to be at least 48” long. You will start your pour at one end and use the screed to push the concrete from left to right, do not pour bottom to top. Sit one end of the screed on the back wall form (if against a wall) while sitting the other side on the front form. Push the screed along to make sure everything is level. Low spots are next to impossible to fix so you want to pay special attention to make sure the forms are filled all the way to the top. If you don’t have a screed, you can use any straight edge such as a level or a nice straight 2x4.
Vibra-Blade – Vibrating is an important step when pouring concrete countertops. Our Vibra-Blade makes this step simple. The Vibra-Blade can be used to run along both the inside of the form and the outside edge. This cuts down on the risk of air bubbles or voids on the edges. If you don’t have a Vibra-Blade, you can run an electric sander (without the paper) or something similar along the outside edge. You can even use your float or trowel to tap the outside edge during the pour as well.
Float – The most common type of float for a concrete countertop is the Magnesium float. This is used about 30-60 minutes after the pour (in controlled, indoor conditions). You will get most of your smoothing done with the float. It will also allow you to pull the cream to the surface which will be needed in your final finish. You will know it’s time to use the float when the concrete starts to look dull and dry. If the concrete starts to look dull and dry again after your first float but it’s still too soft to trowel, it’s ok to float it again. When using the White Countertop Mix, we recommend using a Lexan Float instead of Magnesium Float to prevent any burn or transfer of color from the tools to the white concrete.
Finishing Trowel – The finishing trowel is the last tool you will use until the concrete is hard. This is used to close off the surface of the cream that was left porous by the float. It will help you achieve a very smooth final finished surface. The concrete should look dull and dry and should be fairly set up before you use the finishing trowel. When you put your fingers down and use a little bit of pressure, it shouldn’t leave any imprint. If you use the steel trowel when the concrete is too wet, you can end up with surface problems. When using the White Countertop Mix, we recommend using a Chrome Finishing Trowel instead of Steel Finishing Trowel to prevent any burn or transfer of color from the tools to the white concrete.
Sanding Discs – It’s important that you sand your countertop before applying sealer. This will help remove any small imperfections but also make sure you have a uniform, open surface that will take stain and sealer. We recommend that you sand with an orbital sander and not use anything higher than a 220/320 grit paper. You may need to be more aggressive if you have any texture or imperfections. In that case, you would want to use something like our Diamond Discs.
Wet Polisher – Polishing your concrete countertop is optional. When you use a wet polisher with Diamond Polishing Pads, it will leave you with a very smooth, glass-like surface. It will also expose the aggregate in the concrete. Some people choose to polish for the sole purpose of achieving an exposed aggregate look. If you end up with a rough surface on your countertop, a wet polisher may be your best option to smooth it out. You would begin with the lowest grit necessary (typically 50 or 100 grit) and work your way up. Usually, you will go up to at least 200 grit. You can continue to polish higher but keep in mind that some stains and sealers won’t adhere to highly polished concrete.
It's important that you have the proper tools and know the correct way to use them if you hope to be successful in pouring a concrete countertop. If you aren’t sure about anything mentioned here, please feel free to give us a call at 570-587-3799 and we can guide you further.

